博主并不是很了解前端知识,只是想搭建一个自己的平台,留下自己的一点痕迹,有一个属于自己的网络小小天地。因此对于博客配置也是很简单的配置,博客也相对比较简单,基本上为小白白,因此教程笔记应该是很好复现的。有任何问题欢迎留言评论~
基础框架搭建 基础配置部分不进行介绍,参考官方的手册Butterfly 安装文档(一) 快速开始 ,这里进行一些重要的点的总结
关于主题配置文件_config.yml 在 hexo 的根目录创建一个文件 _config.butterfly.yml,并把主题目录的 _config.yml 内容复製到 _config.butterfly.yml 去。( 注意: 复製的是主题的 _config.yml ,而不是 hexo 的 _config.yml)_注意: 不要把主题目录的 _config.yml 删掉_config.butterfly.yml进行配置就行。_config.butterfly.yml, 配置主题的 _config.yml 将不会有效果。 Hexo会自动合并主题中的_config.yml和 _config.butterfly.yml里的配置,如果存在同名配置,会使用_config.butterfly.yml的配置,其优先度较高。
hexo 的 _config.yml配置部署 需要安装插件
npm install hexo-deployer-git --save
下面是博主部署的配置
# Deployment ## Docs: https://hexo.io/docs/one-command-deployment deploy: - type: git repo: [email protected] :tyxiumud/tyxiumud.github.io.git ## 库地址 branch: gh-pages ## 分支名称 - type: git repo: https://gitee.com/xiumud/xiumud.git branch: gh-pages
然后使用默认三连即可
预览三连: hexo clean && hexo g && hexo s
部署三连: hexo clean && hexo g && hexo d
参考:https://hexo.io/docs/one-command-deployment
检查url配置
url应该是你的地址
permalink建议设置为如下形式,就是静态地址的形式
url: https://tyxiumud.github.io
permalink: posts/:hash/
permalink_defaults:
pretty_urls:
  trailing_index: true # Set to false to remove trailing 'index.html' from permalinks
  trailing_html: true # Set to false to remove trailing '.html' from permalinks
实例如下,需要首先安装
deploy: - type: git repo: [email protected] :tyxiumud/tyxiumud.github.io.git ## 库地址 branch: gh-pages ## 分支名称 - type: git repo: https://gitee.com/xiumud/xiumud.git branch: gh-pages
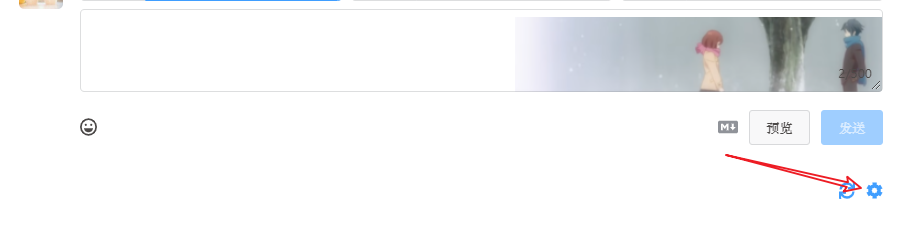
进阶部分 添加评论 本博客使用的是Twikoo,Vercel部署,免费,缺点是速度慢…..具体程度可以参考本网站的底部的评论。
再说说好处,教程很全,有对应的QQ群进行交流,作者的部署教程 。很快捷的定义邮箱通知评论,评论管理方便。点击齿轮即可进行配置。页面很友好。
图片压缩 Butterfly主题如果需要使用到很多图片。尤其是访问github或者gitee总是速度不是很快。图片太大,会严重拖慢网站的加载速度。图片压缩能够有效的缓解这个问题。
在线网站 可以进行线上图片文件的的压缩。对于图床推荐使用imgbot进行整个图床的压缩。imgbot 是一款 Github 插件。安装后,你上传图片到 Github 去,imgbot 会自动压缩图片并推送 PR,只需要合并PR 就行你可以配置 imgbot 的侦测方法、压缩方法(有损/无损),具体可以查看插件的文档。caesium 本地软件图片压缩
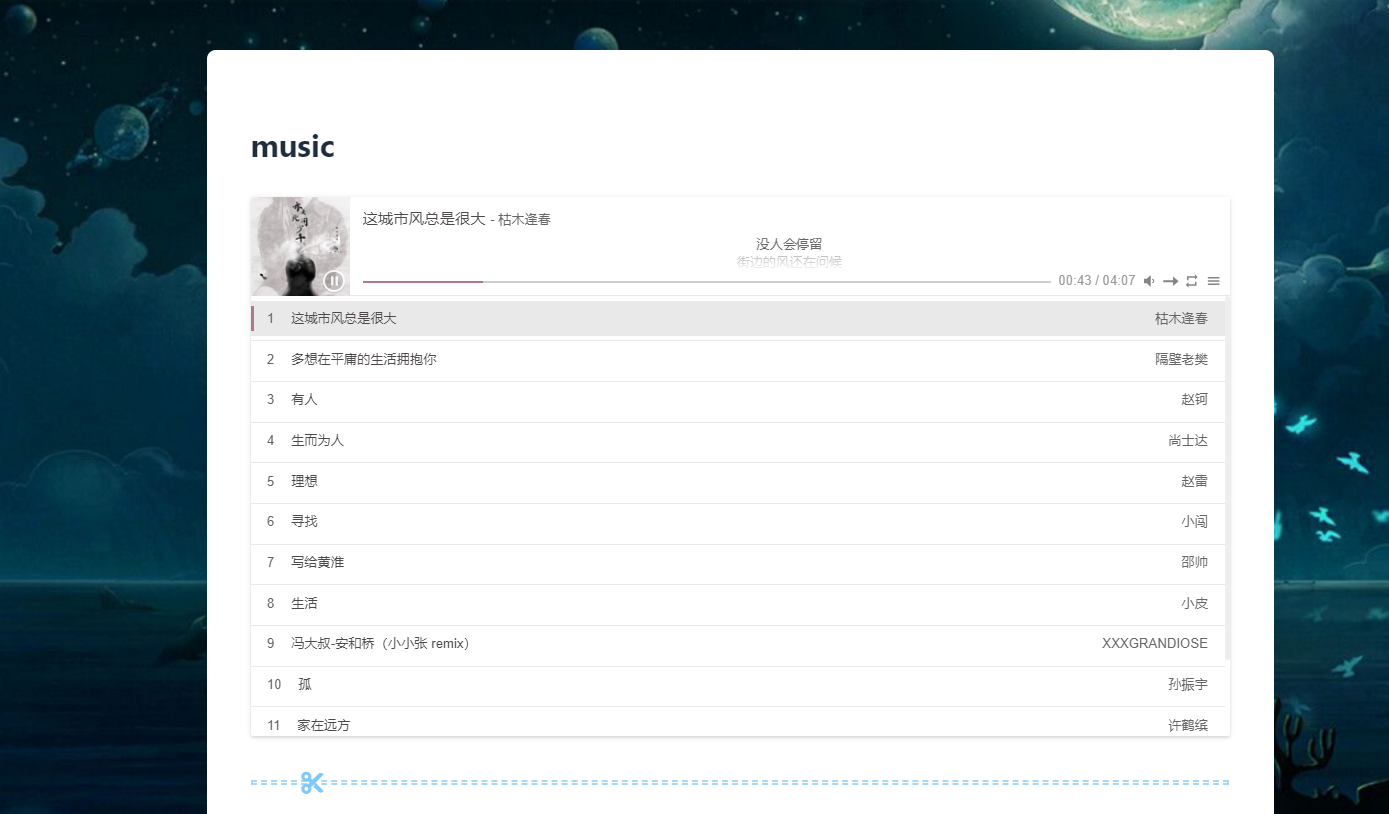
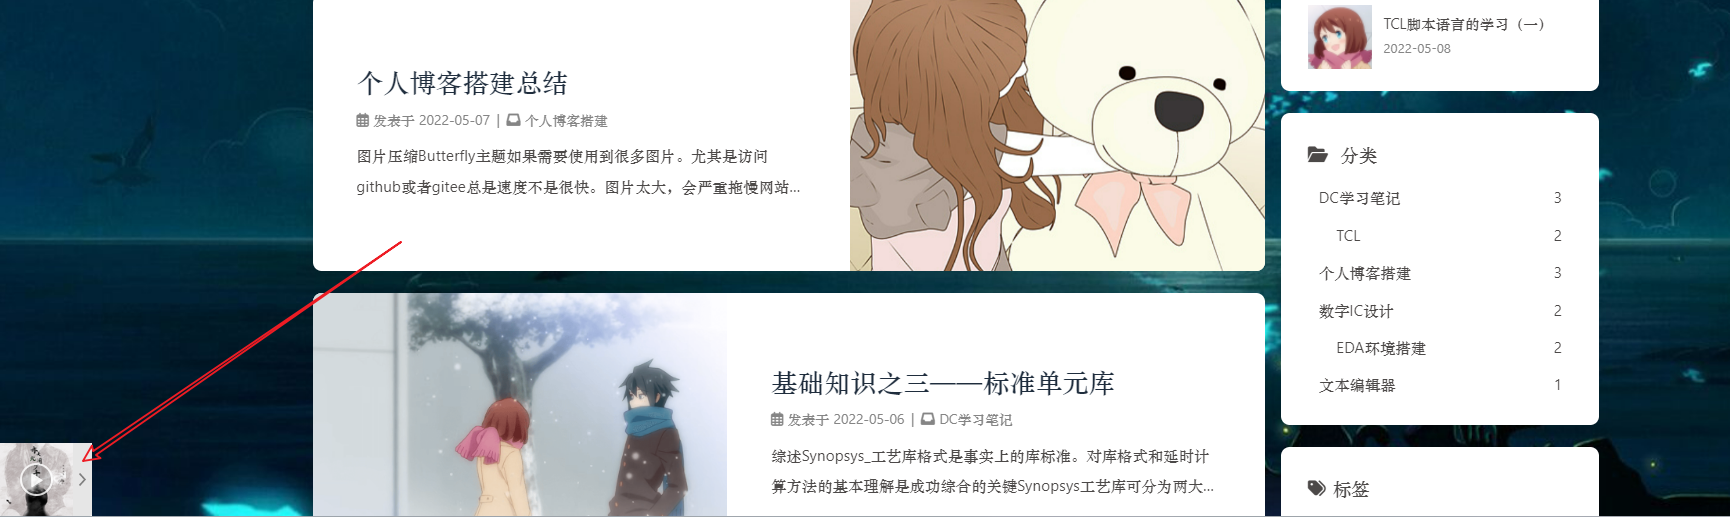
定制化功能实现 Hexo-Butterfly添加音乐播放器 改部分分为两个小节,普通音乐播放与全局固定模式。效果演示如下所示,配置添加方式详见请点击这里
普通界面播放器
全局吸底Aplayer模式
/* 隐藏 Aplayer 的全局吸底音乐标签,在css中添加 */
.aplayer.aplayer-fixed.aplayer-narrow .aplayer-body {
    left: -66px !important
}

.aplayer.aplayer-fixed.aplayer-narrow .aplayer-body:hover {
    left: 0 !important
}
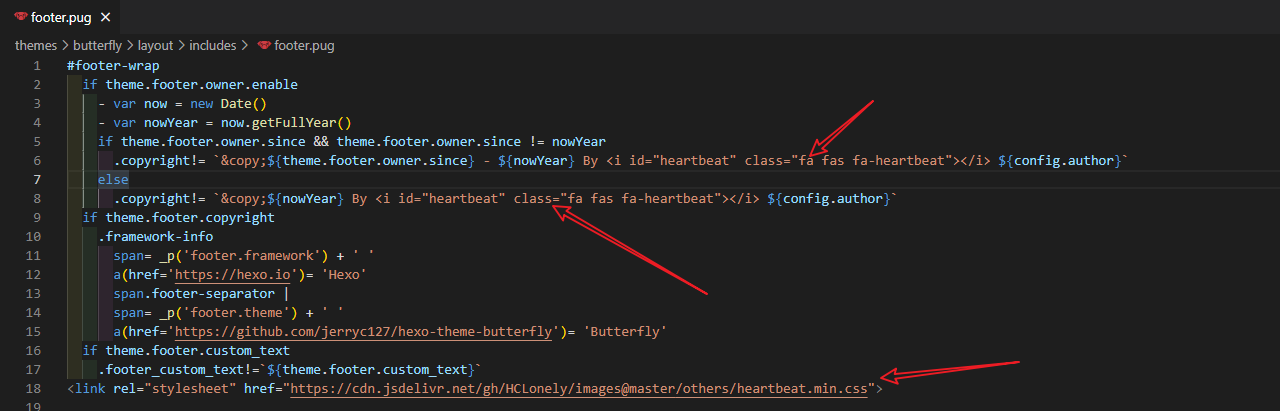
页脚的美化 实现跳动的心功能 实现效果如下
themes\butterfly\layout\includes\footer.pug
<i id="heartbeat" class="fa fas fa-heartbeat"></i>
将其复制到By与${config.author}的中间,注意第6与第8行均需要复制,然后将如下指令复制到文件的最后一行即可。或者将By删除也是可以的,具体看自己喜好。
<link rel="stylesheet" href="https://cdn.jsdelivr.net/gh/HCLonely/images@master/others/heartbeat.min.css">
参考:https://blog.csdn.net/weixin_42429718/article/details/105723193
页脚年份与版权设置 在custom_text:项下输入如下指令
#博客年份
footer:
  owner:
    enable: true
    since: 2022
  copyright: false # Copyright of theme and framework
  custom_text: <p>  <a style="margin-inline:5px" target="_blank" href="https://hexo.io/"><img src="https://img.shields.io/badge/Frame-Hexo-blue?style=flat&logo=hexo" title="博客框架为Hexo"></a>  <a style="margin-inline:5px" target="_blank" href="https://butterfly.js.org/"><img src="https://img.shields.io/badge/Theme-Butterfly-6513df?style=flat&logo=bitdefender" title="主题采用butterfly"></a><a style="margin-inline:5px" target="_blank" href="https://github.com/"><img src="https://img.shields.io/badge/Source-Github-d021d6?style=flat&logo=GitHub" title="本站项目由Gtihub托管"></a><a style="margin-inline:5px" target="_blank" href="http://creativecommons.org/licenses/by-nc-sa/4.0/"><img src="https://img.shields.io/badge/Copyright-BY--NC--SA%204.0-d42328?style=flat&logo=Claris" title="本站采用知识共享署名-非商业性使用-相同方式共享4.0国际许可协议进行许可"></a></p>
参考:https://www.cnblogs.com/yyyzyyyz/p/15542401.html
鼠标样式 参考yyyz 的设置。在我的themes\butterfly\source\css目录下新建一个css文件。命名为my.css
写入如下内容
/*指针样式*/
body {
    cursor: url(https://cdn.jsdelivr.net/gh/sviptzk/HexoStaticFile@latest/Hexo/img/default.cur),
        default;
}
/*链接小手样式*/
a,
img {
    cursor: url(https://cdn.jsdelivr.net/gh/sviptzk/HexoStaticFile@latest/Hexo/img/pointer.cur),
        default;
}
在主题配置文件中引入即可。下面是我自己的配置,使用时根据自己的css名称进行修改
inject:
  head:
    - <link rel="stylesheet" href= "/css/my.css">
  bottom:
    #- <script src="/js/catch-the-cat.js"></script>
    #- <div class="aplayer no-destroy" data-id="7422861869" data-server="netease" data-type="playlist" data-fixed="true" data-autoplay="true" data-lrcType="-1"> </div>
参考:https://yyyzyyyz.cn/posts/2d51c9bd3490/
字体设置 修改字体样式直接引入css文件和字体包即可。
1、首先寻找喜欢的字体,有些字体很好看并且是免费非商用的,我们可以拿来用。
这里推荐几个网址供参考:方正字库 ,第一字体网 ,字体天下,字体家,自由字体
2、将需要使用的字体文件放入博客目录下,我这里是放在themes\butterfly\source\css下,方便css文件引入。
3、如有有css文件,就在最下面继续写;如果没有,则新建一个css文件,文件名任取。写入保存。引用方式同鼠标样式引入方式一致。
@font-face{
  font-family: 'FZQianLXSJW' ;  /* 自定义字体名称 */
  src: url(FZQianLXSJW.tff); /* 引入字体文件的路径 */
}
/*应用在body体里,放在第一个,font-family会按顺序使用字体族。如果第一个没找到就会找第二个,以此类推。*/
body {
font-family: FZQianLXSJW,-apple-system, BlinkMacSystemFont, "Segoe UI", "Helvetica Neue", Lato, Roboto, "PingFang SC", "STZhongsong", "Lantinghei SC", sans-serif
}
将你的字体放在你的根目录下 themes\butterfly
参考:https://yyyzyyyz.cn/posts/2d51c9bd3490/
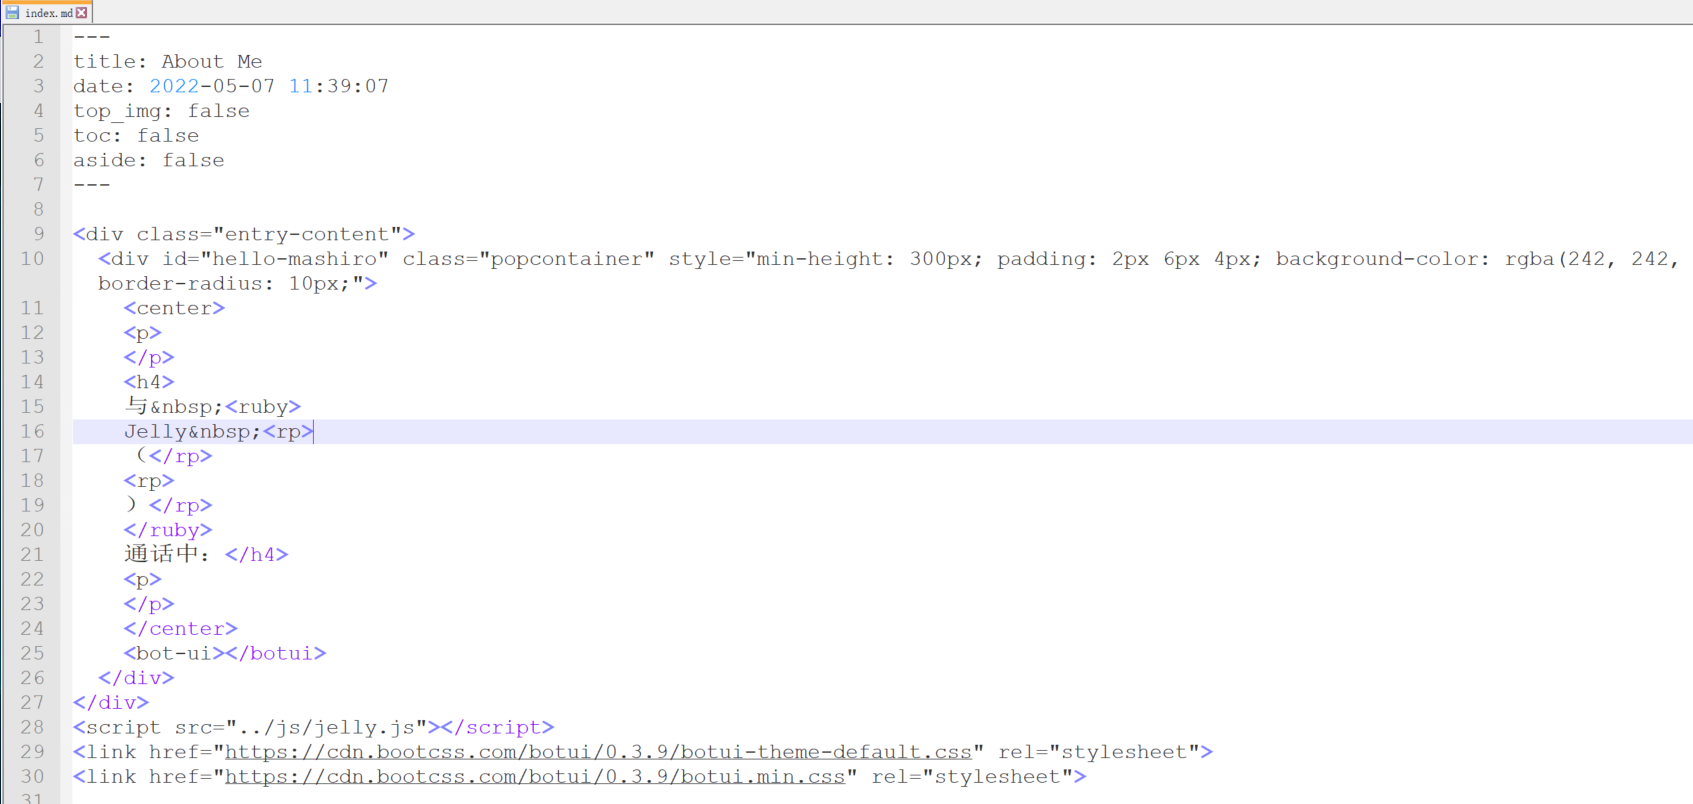
About Me-自我介绍botui机器人 页面效果点击查看
代码如下,自行下载srcJelly.js文件即可,这里放在githhub或者是放在本地都是可以的。放在本地就是将其放置在themes\butterfly\source\js如下目录即可。下载地址点击这里 。内容如下,将其修改为你想修改的即可。
修改对应的index.xml文件如下所示
<div class="entry-content"> <div id="hello-mashiro" class="popcontainer" style="min-height: 300px; padding: 2px 6px 4px; background-color: rgba(242, 242, 242, 0.5); border-radius: 10px;"> <center> <p> </p> <h4> 与 <ruby> Jelly <rp> (</rp> <rp> )</rp> </ruby> 通话中:</h4> <p> </p> </center> <bot-ui></botui> </div> </div> <script src="../js/jelly.js"></script> <link href="https://cdn.bootcss.com/botui/0.3.9/botui-theme-default.css" rel="stylesheet"> <link href="https://cdn.bootcss.com/botui/0.3.9/botui.min.css" rel="stylesheet">
参考:https://blog.csdn.net/qq_35982918/article/details/106728754?spm=1001.2014.3001.8078#comments_21134639
透明背景设置与黑暗模式下的适配 css文件如下。可以新建一个,也可以直接写入之前的文件里。使用vscode可以查看基本的形式。使用F12,分析网页元素来进行查看对应的样式,需要有一丢丢前端的基础。不会的可以直接使用博主提供给的css文件。
/*文章页背景*//*分类页面*//*时间轴页面*/
.layout #post, .layout #page , .layout #archive , .layout #category{
    /* 以下代表透明度为0.5 可以自行修改*/
	background:rgba(255, 255, 255, .9);
}
/*侧边栏页面*/
#aside-content .sticky_layout .card-widget , #aside-content .card-widget{
    background: rgba(255,255,255,.8);
}
/* 所有页面背景 */
#recent-posts>.recent-post-item, .read-mode .layout_post>#post{
    /* 以下代表透明度为0.5 */
    background: rgba(255,255,255,.8);
}
#page-header #nav {
    /* 以下代表透明度为0.5 */
    background: transparent!important;
}

/*以下是封面图透明*/
#page-header.full_page::before {
    background-color: transparent!important;
  }

/*文章页背景*//*分类页面*//*时间轴页面*/
[data-theme = dark] .layout>#post,[data-theme = dark] .layout #page ,[data-theme = dark] .layout #archive ,[data-theme = dark] .layout>#category{
    /* 以下代表透明度为0.5 可以自行修改*/
	background:rgba(0, 0, 0, 0.9);
    }
/*侧边栏页面*/
[data-theme = dark] #aside-content .sticky_layout .card-widget , [data-theme = dark] #aside-content .card-widget{
    background:rgba(0, 0, 0, 0.9);
}
/* 所有页面背景 */
[data-theme = dark] #recent-posts>.recent-post-item,[data-theme = dark]  .read-mode .layout_post>#post{
    /* 以下代表透明度为0.5 */
    background:rgba(0, 0, 0, 0.9);
}
下面提供两种方式进行查看配置。可以帮助根据需要查看修改自己的配置。
使用F12查找样式的方式
使用vscode查看样式
参考:
https://www.cnblogs.com/glory-yl/p/15399411.html
https://www.yyyzyyyz.cn/posts/2d51c9bd3490/#%E5%9B%BE%E7%89%87%E9%80%8F%E6%98%8E%E5%BA%A6%E4%BF%AE%E6%94%B9
随机背景 在 bottom 处插入以下代码。在 backimg 数组里替换自己想要的图片链接。即可。实现效果参见笔者的博客。
inject:
  head:
  bottom:
    - <script> let backimg =["url(/img/background.png)","url(/img/background1.png)","url(/img/background2.png)"];let index =Math.ceil(Math.random() * (backimg.length));document.getElementById("web_bg").style.backgroundImage = backimg[index]</script>
推荐两个网站,可以下载高清图片,记得使用上述的压缩软件进行图片的压缩。
参考:
https://zfe.space/post/55346.html
https://akilar.top/posts/ebf20e02/#%E9%9A%8F%E6%9C%BA%E8%83%8C%E6%99%AF%E6%88%96banner%E6%95%88%E6%9E%9C
两位都是大佬~


 微信
微信 支付宝
支付宝